Polishing a Travertine table top questions

La.Swampfox

Member
Joined
May 16, 2019
Messages
17
Location
Lake Charles, La.
Name
G. D. Simmons
Gentlemen:

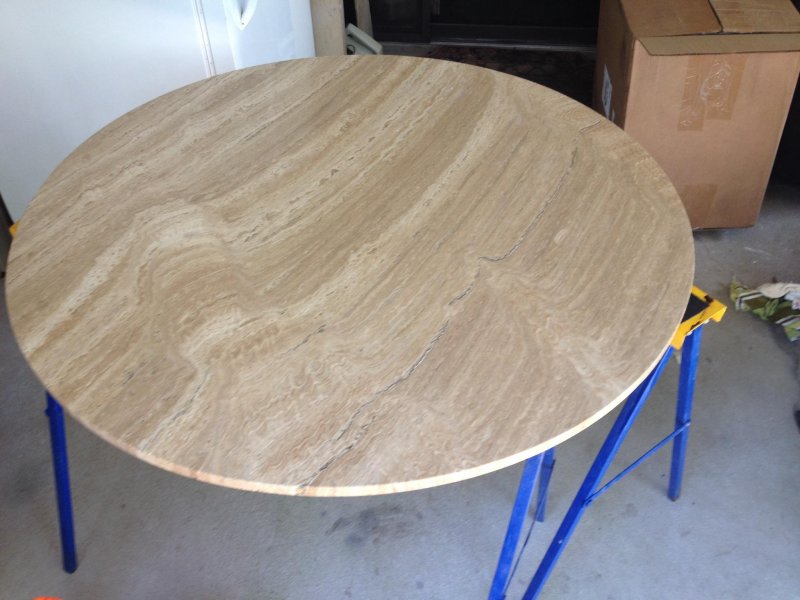
I am new here and seeking some expert advice. I have a table with a round Travertine top that has been in the family for about 60 years. It has gotten dull looking all over, with what I guess you all refer to "etch" spot areas that are a little worse. I have been looking all over the net for info and products to try to re-polish it; and finding lots of info that is sometimes conflicting. Most of the products only come in large bulk quantities to do hundreds of square feet of flooring etc. Some recommend dry polishing powders, and others the paste type compounds. Some contain acids, that require special neutralizing rinses; and I worry about getting on the wood. Others seem to involve diamond impregnating pads and use a very low rpm polisher that I do not have. My question;; .... is it possible to re-polish and put a fairly even shine (doesn't have to be a really high gloss; just even looking again with some shine) by maybe using a wet/dry 800 grit sandpaper and wet sanding it? Table top is about 3' in diameter. If this is possible; would it be best to do by hand, or with an orbital sander?

Thanks in advance for any info and help-
 

Mikey P

Administrator
Joined
Oct 6, 2006
Messages
112,308
Location
The High Chapperal
IMG951052.jpg


Here it is..

So do you have a Makita type polisher?

Or any experience in this sort of stuff?

How much are you willing to spend on materials?
 

La.Swampfox

Member
Joined
May 16, 2019
Messages
17
Location
Lake Charles, La.
Name
G. D. Simmons
What are you concerns?

Any scratches?

Is a shine important or will an even overall apperence be good enough?

I would like at least a little shine, but don't need a high gloss. Mainly an even appearance. It has gotten dull all over; but when the light hits it right there are definitely spots that appear worse like something maybe spilled and set a while before clean-up. Nothing really bad or any bad scratches.......just the dull, splotchy look.
 

Mikey P

Administrator
Joined
Oct 6, 2006
Messages
112,308
Location
The High Chapperal
Buy a cheap polisher from Harbor Freight

Then call Hard Rock/ Stone Pro supply in Anaheim CA and order 3" 200 and 400 Diamond Impregnated Pads, a 3" driver and some EMP polish.

Get those in your hands, then we'll proceed with further directions
 

La.Swampfox

Member
Joined
May 16, 2019
Messages
17
Location
Lake Charles, La.
Name
G. D. Simmons
Another option is to use this...

Glass & Metal Magic / Waterspot Stain Remover Amazon product

And a hogs hair punch out by hand..

This will give a 400 grit look to it, which is a step up from dull


Will have to look around for this. The link to Amazon shows "out of stock; and don't know when or if it will be available again". Sounds like it might achieve a polish good enough to look nice, without a lot of expense or trouble; and probably not aggressive enough for a amateur like me to mess something up permanently.
 

clean image

Member
Joined
Oct 5, 2012
Messages
968
Location
Orlando
Name
Carl Maddock
do not use DIP's, use resins.

Harbo tool will get through job- it just smells like its about to start fire, that all...

I would recommend 5 inch driver and you be fine with 220 resin then 800. You could polish after 220 if needed, lower shine.
I would recommend renu over EMP
protect surroundings
job would take less than 1 hour start to finish

orbital not aggressive enogh

thats a vein cut trav
 

La.Swampfox

Member
Joined
May 16, 2019
Messages
17
Location
Lake Charles, La.
Name
G. D. Simmons
do not use DIP's, use resins.

Harbo tool will get through job- it just smells like its about to start fire, that all...

I would recommend 5 inch driver and you be fine with 220 resin then 800. You could polish after 220 if needed, lower shine.
I would recommend renu over EMP
protect surroundings
job would take less than 1 hour start to finish

orbital not aggressive enogh

thats a vein cut trav

Clean Image:
I really appreciate your time, and the courtesy of a reply.....but to be honest, that is all Greek to me. I have no idea what DIP's are, or the resins you mentioned. I am guessing the Renu and EMP are maybe brand names of polishing compounds/products??? As you have probably guessed, I know absolutely nothing about stone polishing. I spent just under 50 years using a 250 Lincoln Welder, Victor cutting torches, and various makes of 7"- 9" side grinders; ....grinding pipe bevels, and welds are something I know a lot about, and can make that metal shine like a Buick bumper....but I am a babe-in-the-woods with this project. LOL

A former carpenter friend of mine told me he saw Stone Workers on construction jobs cut and repolish marble to a high shine using only wet/dry silicon carbide sand paper and going from 220/240 grit up to 800/1000 range by steps.. I didn't know if he knew what he was talking about, so came here for confirmation or rebuttal. I know that is nearly as hard as the diamond pads I have seen mentioned, and Travertine appears to be pretty soft; so thought maybe some truth to it. Guess not, as no one has concurred with this method
 

Old Coastie

Supportive Member
Joined
Jun 29, 2015
Messages
7,504
Location
Heart of Dixie
Name
Stephen
G.D. What they are describing is the use of diamond-resin stone honing disks.

To answer your question the way you asked: Yes you can wet sand your way to a decent finish. Start with 400 grit and work your way up to the finest you can get at an auto paint supply. Go to maybe 5000 grit.
200, 400, 800, 1500, 2000, 5000. Or go as high as you can. Use a flat backing pad on your sander and be VERY careful not to cut the surface with the edge as you start and stop.
Go back and forth, up and down. Work sections, overlap them a bit and be very disciplined and methodical. Be sure to thoroughly rinse each time. Be sure the surface looks evenly cut, because there are always bits that somehow escape at least one step and they will show up at the end.

Then polish it with Meguire’s fast cut and Meguire’s fine cut polish, all from Harbor Freight. Inspect it under artificial light, NOT sunlight. If something isn’t good, take that area back to whatever grit and work it back up. Be patient!

It will have a wonderful shine. Use car wax on it to preserve the finish, but also be a jerk about nobody setting a Coke on it. Anything acidic will instantly dull the finish.
Good luck.
 

La.Swampfox

Member
Joined
May 16, 2019
Messages
17
Location
Lake Charles, La.
Name
G. D. Simmons
G.D. What they are describing is the use of diamond-resin stone honing disks.

To answer your question the way you asked: Yes you can wet sand your way to a decent finish. Start with 400 grit and work your way up to the finest you can get at an auto paint supply. Go to maybe 5000 grit.
200, 400, 800, 1500, 2000, 5000. Or go as high as you can. Use a flat backing pad on your sander and be VERY careful not to cut the surface with the edge as you start and stop.
Go back and forth, up and down. Work sections, overlap them a bit and be very disciplined and methodical. Be sure to thoroughly rinse each time. Be sure the surface looks evenly cut, because there are always bits that somehow escape at least one step and they will show up at the end.

Then polish it with Meguire’s fast cut and Meguire’s fine cut polish, all from Harbor Freight. Inspect it under artificial light, NOT sunlight. If something isn’t good, take that area back to whatever grit and work it back up. Be patient!

It will have a wonderful shine. Use car wax on it to preserve the finish, but also be a jerk about nobody setting a Coke on it. Anything acidic will instantly dull the finish.
Good luck.

Old Coastie:
Many thanks for your reply and info. I had just about made up my mind to go ahead and try this, and your post gives me a little more confidence I am not making a bad decision. I really don't have anything to lose as it is. It will at least have a more uniform appearance; and who knows.....I might get lucky. I would think at most I will be losing only a few thousandths of an inch; and I have just under a 7/8" thick slab to work with. If it doesn't go well, there is plenty left for a "Stone Pro" to work with; and I just found one less than an hour away who said he/they could do it for about $200.00. Will see about rounding up all the required materials and give it a try. When done I will post some pics, good or bad, of the final result for all the responders who have been kind enough to reply and offer advice.
 

Old Coastie

Supportive Member
Joined
Jun 29, 2015
Messages
7,504
Location
Heart of Dixie
Name
Stephen
You will be fine. Think of it as making finer and finer scratches until the eye only perceives a gloss. The filler will not polish, it will stay dull. Don’t waste a thought about it and just swing for the fences!
 
  • Like
Reactions: Mikey P

La.Swampfox

Member
Joined
May 16, 2019
Messages
17
Location
Lake Charles, La.
Name
G. D. Simmons
You will be fine. Think of it as making finer and finer scratches until the eye only perceives a gloss. The filler will not polish, it will stay dull. Don’t waste a thought about it and just swing for the fences!

Old Coastie:
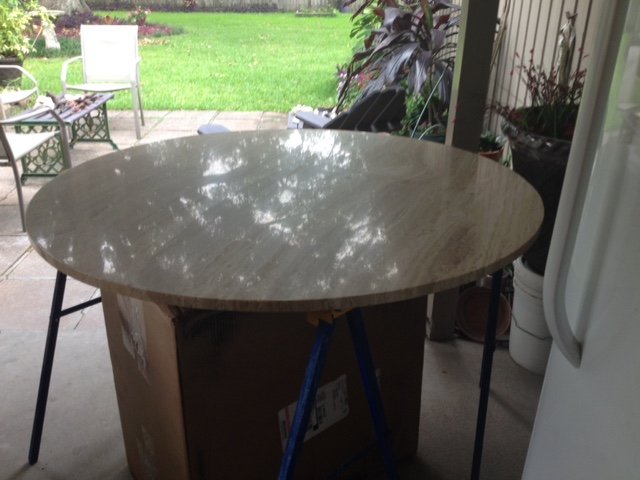
You obviously missed your natural calling; should have been a baseball coach. LOL I followed your advice to "swing for the fences"; and I seem to have hit a Grand Slam Home Run! I had gone by my local Harbor Freight to get a cheap orbital palm/hand sander, figuring the rock/stone dust would have the same effect on my good sander that pouring sand in the crankcase of my truck would have. They also had combo packs of 220, 500, 1000, and 1200 grit wet/dry silicon carbide for CHEAP and it looked like good quality stuff, so bought it. On to the local auto parts store and picked up 1500 and 2000 grit which was the finest they had. Spent about 5 to 5 hours on it and it looked REALLY GOOD. Decided to try and find some 3000 as you suggested. Found one place with 2500 so went and got it. Went through all the grades sanding dry. Did a final polish wet with the last of the 2500 grade. Now it looks even BETTER! I was only 9 when my Mother got this table; and that was 60 years ago; so I can't remember or swear to it for sure, but I don't think it was this shiney when it was brand new. The picture attached below is just wiped off and cleaned with NOTHING on it. It was taken against a very overcast sky a little after 6:00PM. You can see the reflection of that large oak tree in it nearly like a mirror. I actually noticed a squirrel running on a limb in the reflection when I was fixing to snap the pic. Believe it or not, that little $11.00 (with coupon) "Drill Master" sander held up like a champ and completed the job running strong....surprised the Hell out of me! Now I have to decide which direction to go from here. Do you have any more good advice to seal, or not to seal, with one of the many stone seal products I have seen; or any other finish protector or polish to put on it?

Many thanks in advance-

table.JPG
 

Cleanworks

Moderator
Joined
Oct 22, 2012
Messages
26,928
Location
New Westminster,BC
Name
Ron Marriott
Old Coastie:
You obviously missed your natural calling; should have been a baseball coach. LOL I followed your advice to "swing for the fences"; and I seem to have hit a Grand Slam Home Run! I had gone by my local Harbor Freight to get a cheap orbital palm/hand sander, figuring the rock/stone dust would have the same effect on my good sander that pouring sand in the crankcase of my truck would have. They also had combo packs of 220, 500, 1000, and 1200 grit wet/dry silicon carbide for CHEAP and it looked like good quality stuff, so bought it. On to the local auto parts store and picked up 1500 and 2000 grit which was the finest they had. Spent about 5 to 5 hours on it and it looked REALLY GOOD. Decided to try and find some 3000 as you suggested. Found one place with 2500 so went and got it. Went through all the grades sanding dry. Did a final polish wet with the last of the 2500 grade. Now it looks even BETTER! I was only 9 when my Mother got this table; and that was 60 years ago; so I can't remember or swear to it for sure, but I don't think it was this shiney when it was brand new. The picture attached below is just wiped off and cleaned with NOTHING on it. It was taken against a very overcast sky a little after 6:00PM. You can see the reflection of that large oak tree in it nearly like a mirror. I actually noticed a squirrel running on a limb in the reflection when I was fixing to snap the pic. Believe it or not, that little $11.00 (with coupon) "Drill Master" sander held up like a champ and completed the job running strong....surprised the Hell out of me! Now I have to decide which direction to go from here. Do you have any more good advice to seal, or not to seal, with one of the many stone seal products I have seen; or any other finish protector or polish to put on it?

Many thanks in advance-

View attachment 90943
Looks great.
 

Old Coastie

Supportive Member
Joined
Jun 29, 2015
Messages
7,504
Location
Heart of Dixie
Name
Stephen
Old Coastie:
You obviously missed your natural calling; should have been a baseball coach. LOL I followed your advice to "swing for the fences"; and I seem to have hit a Grand Slam Home Run! I had gone by my local Harbor Freight to get a cheap orbital palm/hand sander, figuring the rock/stone dust would have the same effect on my good sander that pouring sand in the crankcase of my truck would have. They also had combo packs of 220, 500, 1000, and 1200 grit wet/dry silicon carbide for CHEAP and it looked like good quality stuff, so bought it. On to the local auto parts store and picked up 1500 and 2000 grit which was the finest they had. Spent about 5 to 5 hours on it and it looked REALLY GOOD. Decided to try and find some 3000 as you suggested. Found one place with 2500 so went and got it. Went through all the grades sanding dry. Did a final polish wet with the last of the 2500 grade. Now it looks even BETTER! I was only 9 when my Mother got this table; and that was 60 years ago; so I can't remember or swear to it for sure, but I don't think it was this shiney when it was brand new. The picture attached below is just wiped off and cleaned with NOTHING on it. It was taken against a very overcast sky a little after 6:00PM. You can see the reflection of that large oak tree in it nearly like a mirror. I actually noticed a squirrel running on a limb in the reflection when I was fixing to snap the pic. Believe it or not, that little $11.00 (with coupon) "Drill Master" sander held up like a champ and completed the job running strong....surprised the Hell out of me! Now I have to decide which direction to go from here. Do you have any more good advice to seal, or not to seal, with one of the many stone seal products I have seen; or any other finish protector or polish to put on it?

Many thanks in advance-

View attachment 90943
Nothing really is bulletproof and remember that travertine will etch if anything acid is spilled on it. You could use Saiger Super Sealer, but then if it is an outdoor table you could just apply a good automobile paste wax from time to time.
By the way, you really did a good job. Well done!
 
  • Like
Reactions: Mikey P

La.Swampfox

Member
Joined
May 16, 2019
Messages
17
Location
Lake Charles, La.
Name
G. D. Simmons
Nothing really is bulletproof and remember that travertine will etch if anything acid is spilled on it. You could use Saiger Super Sealer, but then if it is an outdoor table you could just apply a good automobile paste wax from time to time.
By the way, you really did a good job. Well done!

No; it has always been an inside living room/den "coffee table"; and I guess will continue as such as long as I am alive. The slab sits on 3 trestle type pedestals on a round wooden base, forming an open type table. My Son had it for the last 8-9 years after my Dad passed away. Don't know what the Grandkids may have spilled on it; or even what damage my Mother may have caused possibly using the wrong cleaners on it. I have some 511 Impregnator Sealer made by Miracle Sealants that I bought a year or so ago to seal some tile and grout that seemed to be absorbing water. Seems to have worked; but also seemed to have dulled the tile somewhat. Is this typical for all sealants to dull the shine a little; and would this be an acceptable product in your opinion? (It has Marble and Travertine listed on the label.)

As a side note that may be of some future use to all of you doing stone work. Some of the original filler in the voids had chipped out in places; and I guess the Grandkids had made the new chips and pock marks in other spots. I was looking at the Stone Pro Traverfill to repair; but it was going to be around $25 for 1 pound shipped; ....and I didn't need but approximately a teaspoon full. I bought a stick of the J. B. Weld Kwick-Wood epoxy putty. Cleaned all the spots with acetone and a Q-Tip, kneaded the 2 parts of the putty together, filled the voids, and scraped/cut off flush with a razor blade. It came out perfect and the light tan color matched the stone's natural color way better than the original dark brown filler. Dries to a very hard epoxy in a couple hours that can be sanded, stained, drilled, etc. Maybe a 15 minute work time before you can feel it starting to set up. You have to really look for it to find it; and simple to work with. Guess not knowing what you are doing sometimes pays off if you are willing to take a chance and experiment with things; ....but then I grew up having to learn to improvise. LOL
 

La.Swampfox

Member
Joined
May 16, 2019
Messages
17
Location
Lake Charles, La.
Name
G. D. Simmons
No; it has always been an inside living room/den "coffee table"; and I guess will continue as such as long as I am alive. The slab sits on 3 trestle type pedestals on a round wooden base, forming an open type table. My Son had it for the last 8-9 years after my Dad passed away. Don't know what the Grandkids may have spilled on it; or even what damage my Mother may have caused possibly using the wrong cleaners on it. I have some 511 Impregnator Sealer made by Miracle Sealants that I bought a year or so ago to seal some tile and grout that seemed to be absorbing water. Seems to have worked; but also seemed to have dulled the tile somewhat. Is this typical for all sealants to dull the shine a little; and would this be an acceptable product in your opinion? (It has Marble and Travertine listed on the label.)

As a side note that may be of some future use to all of you doing stone work. Some of the original filler in the voids had chipped out in places; and I guess the Grandkids had made the new chips and pock marks in other spots. I was looking at the Stone Pro Traverfill to repair; but it was going to be around $25 for 1 pound shipped; ....and I didn't need but approximately a teaspoon full. I bought a stick of the J. B. Weld Kwick-Wood epoxy putty. Cleaned all the spots with acetone and a Q-Tip, kneaded the 2 parts of the putty together, filled the voids, and scraped/cut off flush with a razor blade. It came out perfect and the light tan color matched the stone's natural color way better than the original dark brown filler. Dries to a very hard epoxy in a couple hours that can be sanded, stained, drilled, etc. Maybe a 15 minute work time before you can feel it starting to set up. You have to really look for it to find it; and simple to work with. Guess not knowing what you are doing sometimes pays off if you are willing to take a chance and experiment with things; ....but then I grew up having to learn to improvise. LOL
 

Latest posts

Back
Top Bottom